Is your WordPress site loading slower than a snail climbing uphill? Those gorgeous high-res photos you’ve been proudly displaying might be the culprits! Getting your WordPress image sizes right isn’t just some techie checkbox – it’s crucial if you want happy visitors and better Google rankings.
I’ve spent years wrangling with WordPress images, and trust me, a few simple tweaks can make a world of difference. In this guide, I’ll walk you through everything you need to know – no jargon, just practical advice to keep your site zippy and your images crisp.
Table of Contents
What Is an Image Size?
Let’s get on the same page about what we’re actually talking about when we say “image size.” There are two things to consider:
- Dimensions – How big the image is in pixels (like 1200 × 800 pixels)
- File size – How much data it contains, measured in KB or MB
Both matter a ton for your website. You need decent dimensions for crisp images, but massive file sizes will kill your load times – and nothing makes visitors hit the back button faster than a slow site.
Impact on Page Speed and User Experience
I learned this the hard way – people are impatient online! Research shows that about half of your visitors expect your site to load in under 2 seconds, and 40% will bail if it takes more than 3. Since images usually make up the biggest chunk of a webpage’s size, sorting them out gives you the most bang for your optimization buck.
Choosing the Right Image Format
Before we even get to dimensions, let’s talk file formats – it makes a huge difference:
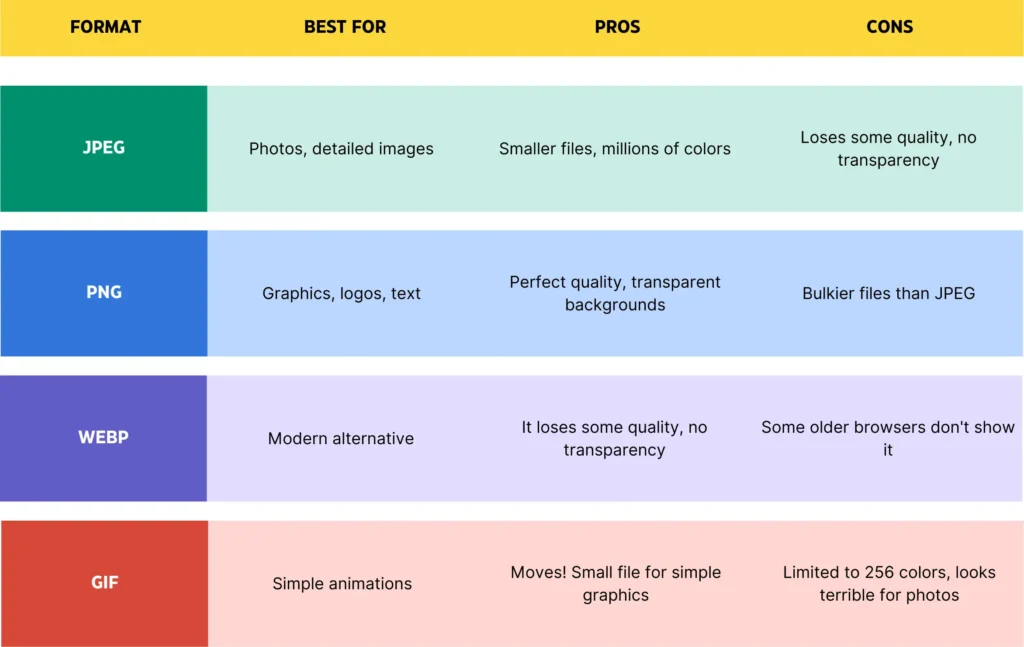
My tip: I use WebP for all my photographs and PNG when I need transparency or have text in the image. Keep it simple.
How WordPress Handles Images
One thing I love about WordPress is that it automatically creates different-sized versions of your images when you upload them.
Automatic Image Resizing in WordPress
When you upload that massive photo from your DSLR camera, WordPress doesn’t just plop it straight onto your site. Instead, it creates multiple versions in different sizes behind the scenes. This is super helpful because it means the right-sized image can be used depending on where it appears.
Default WordPress Image Sizes
By default, WordPress creates four versions of each image:
- Full size – Your original upload, untouched
- Large size – No bigger than 1024 × 1024 pixels
- Medium size – No bigger than 300 × 300 pixels
- Thumbnail – Cropped to exactly 150 × 150 pixels
Adjusting Media Settings in WordPress
You can actually change these default sizes pretty easily. Just head over to Settings → Media in your WordPress dashboard:
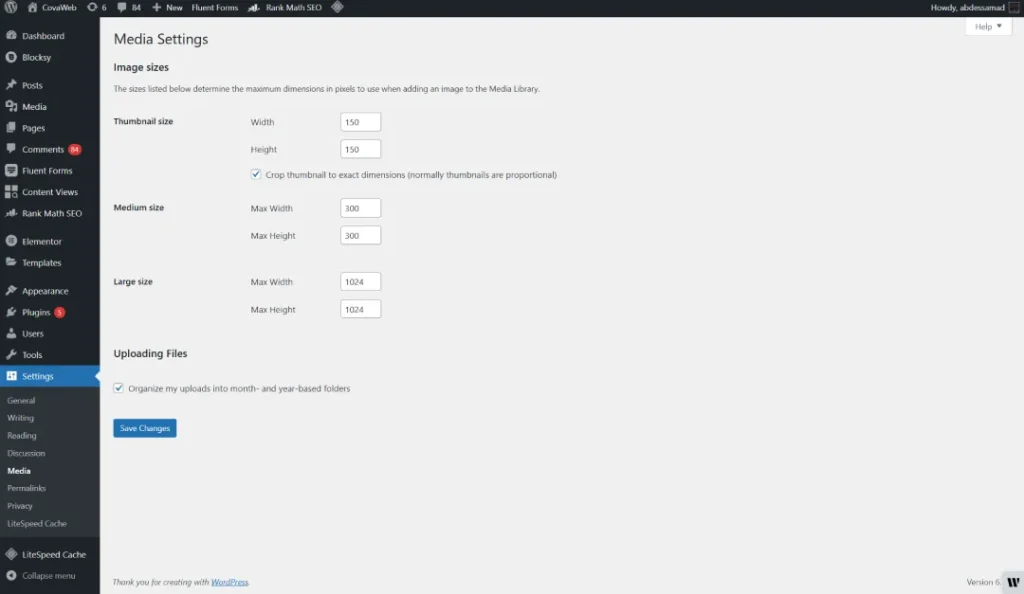
Just remember that changing these settings only affects new uploads – it won’t magically resize all the images already in your media library.
Optimal Image Sizes for WordPress
Different parts of your site need different image dimensions. Here’s what I’ve found works best after years of tweaking:
| Website Element | Recommended Dimensions | Notes |
|---|---|---|
| Background Images | 1920 × 1080 pixels | Covers most modern screens |
| Header Banner Images | 1048 × 250 pixels | Standard header size |
| Thumbnail Images | 150 × 150 pixels | For post lists, sidebars |
| Landscape Featured Images | 1200 × 900 pixels | 4:3 ratio works great |
| Portrait Featured Images | 900 × 1200 pixels | For special layouts |
| Blog Post Images | 1200 × 630 pixels | Perfect for Facebook sharing too |
| Logo Images | 200 × 100 pixels | Depends on your design |
| Hero Images | 2880 × 1500 pixels | For those big homepage banners |
| Fullscreen Slideshows | 2800 × 1500 pixels | For edge-to-edge sliders |
| Gallery Images | 1500px width (height varies) | For photo galleries |
Worth noting: Your theme might have ideas about ideal image sizes. When in doubt, check your theme’s documentation or ask the developer.
How to Optimize Image Size in WordPress
Now for the good stuff—let’s look at how to fix your images so they don’t slow your site to a crawl.
Manual Image Optimization
Before you even think about uploading an image to WordPress, try these tricks:
- Resize first using whatever image editor you have – Photoshop if you’re fancy, or even the free GIMP works great. I sometimes just use Preview on my Mac for basic resizing.
- Compress those puppies using something like TinyPNG online. It’s kind of magical how much smaller it makes files without any visible quality loss.
- Strip out the extra data – most photos contain a bunch of hidden metadata (camera info, location, etc.) that just adds bloat.
Real talk: I try to keep most of my images under 100KB. Anything larger than that better be worth the wait!
Using WordPress Plugins for Image Optimization
If doing all that manually sounds like a headache, I get it. These plugins have saved me countless hours:
- Smush – I use this on several sites. It automatically squeezes down images when you upload them.
- ShortPixel – Their compression is impressive and they convert to WebP formats too.
- Imagify – Made by the WP Rocket folks, so it’s optimized for speed.
For WordPress newbies, plugins are the way to go. If you’re just getting started with WordPress, check out our guide on how to create a WordPress website for beginners – we walk you through everything step by step.
Pro Tips for Image Optimization in WordPress
Define Custom Image Sizes
If the default WordPress sizes don’t quite work for your design, you can add your own. Drop this into your theme’s functions.php file:
// Add custom image sizes
function my_custom_image_sizes() {
    add_image_size( 'blog-featured', 800, 500, true ); // Hard crop
    add_image_size( 'product-thumbnail', 400, 400, true );
}
add_action( 'after_setup_theme', 'my_custom_image_sizes' );
If you’re running a WooCommerce store, you might need special product image sizes. Our comparison of WooCommerce vs Shopify has some extra tips for product image handling.
Use Adaptive Images for Responsive Design
Modern WordPress themes use something called srcset to serve different-sized images based on the visitor’s screen. Here’s how to make the most of it:
- Make sure your theme supports responsive images (most modern ones do)
- Use WordPress’s built-in image sizes in your content
- Test your site on your phone and tablet to make sure everything looks right
For more WordPress optimization tricks, check out our roundup of the best SEO plugins for WordPress, which includes tools that help make your images more Google-friendly.
Convert Images to Next-Gen Formats (WebP, AVIF)
WebP images are about 25-35% smaller than JPEGs or PNGs but look just as good. Most good optimization plugins now offer WebP conversion:
- Turn on WebP in your optimization plugin
- Make sure your hosting can handle WebP (most decent hosts can nowadays)
- The plugin will serve WebP to browsers that support it and fall back to regular formats for older browsers
If your hosting struggles with modern image formats, it might be time for an upgrade. Our guide to the best hosting for WordPress can help you find a better fit.
Final Thoughts
Getting your WordPress image sizes right isn’t rocket science, but it makes a massive difference to your site speed and how professional your site looks. After working with hundreds of WordPress sites, I’ve found that image optimization is often the low-hanging fruit that delivers the biggest improvements.
To wrap up:
- Pick the right dimensions for each part of your site
- Compress everything before uploading
- Use plugins to make your life easier
- Consider Cloudinary if you have tons of images
- Set up custom image sizes if your theme needs them
Don’t make image optimization a one-time thing. Make it part of your workflow every time you add content, and your site will stay snappy for the long haul.
Frequently Asked Questions
What is the best image size for WordPress blog posts?
I’ve found 1200 × 630 pixels works best for most blog posts. It’s large enough to look crisp but won’t slow things down, and happens to be perfect for Facebook sharing.
How do I change image sizes in WordPress?
The easy way is through Settings → Media in your dashboard. For more control, you’ll need to add some code to your functions.php file or use a plugin (way easier if you’re not comfortable with code).
Why are my WordPress images blurry?
Nine times out of ten, it’s because WordPress is trying to stretch a small image to fill a larger space. Always upload images at least as big as you’ll need them to be.
How do I optimize WordPress images for faster loading?
Compress before uploading, use the right dimensions, turn on lazy loading (so images only load when someone scrolls to them), and use a good optimization plugin.
Do WordPress default image sizes change with different WordPress versions?
The basic sizes (thumbnail, medium, large, full) have stayed the same for ages, but some newer themes add their own sizes. Since WordPress 5.3, there’s also built-in handling for super large images – it automatically scales them down during upload.
What WordPress themes handle images best?
In my experience, most premium themes these days handle images well. Check out our recommended themes for blogs – they all have excellent responsive image handling built right in.